Friday, December 29, 2017

Lightning Event Example

Scenario: [Component Event]
1. Create 2 components. One child (childComponent.cmp) and one parent (parentComponent.cmp).
2. Call child component from parent component.
3. Parent component has a String attribute with default value as "Default message.", which will be displayed once this component load first time.
4. Child component has a button.
5. So, once parent component will call then in UI, we will see "one button" (part of child component) and "one string message" (part of parent component).
6. Now the challenge is that, click on the button will set the "Default message." as "Message passing from child component."
In one word, our aim is to pass value from child component to parent component.


Solution:
To execute the above scenario, we will pay with Lightning Event mechanism.

1. So first create an event which will store an event message passing from child component and execute it in parent component.

messagePassingEvent.evt
<!-- messagePassingEvent.evt -->
<aura:event type="COMPONENT" description="Responsible for passing message from child to parent">
    <aura:attribute name="message" type="String"/>
</aura:event>

2. Now create a child component (childComponent.cmp) as show in below source code. Child component should has a button and click on that button will call an action method.
Now in child component registered the above created event (messagePassingEvent.evt) and under action method (in controller) set the event message and then fire it, so that from parent component this message will be fetched and display in UI.

childComponent.cmp
<!-- childComponent.cmp -->
<aura:component>
    <!-- Register event -->
    <aura:registerEvent name="messageEvent" type="c:messagePassingEvent"/>
    
    <!-- Fire event on button click -->
    <ui:button label="Fire Component Event" press="{!c.fireComponentEvent}" />
</aura:component>

childComponentController.js
//childComponentController.js
({
 fireComponentEvent : function(component, event, helper) {
     //Find event
            var msgFrmEvent = component.getEvent("messageEvent");
        
            //Set event parameter
            msgFrmEvent.setParams({"message": "Message passing from child component."});  
        
            //Fire event
            msgFrmEvent.fire();
 }
})

3. Now create a parent component (parentComponent.cmp) as show in below source code. From parent component will call child component and also parent component should has a string attribute with default message, which will be replaced with event message passed from child component by event firing.
So, in parent component we will create an event handler method, from where we will set the event message need to be displayed once button will be clicked.

parentComponent.cmp
<!-- parentComponent.cmp -->
<aura:component implements="force:lightningQuickAction">
    <!-- Local attribute -->
    <aura:attribute name="messageFromEvent" 
                    type="String" 
                    default="Default message."/>    
    
    <!-- calling event handling action method. "name" attribute should be same
   as mentioned on event registration in child component -->
    <aura:handler name="messageEvent" 
                  event="c:messagePassingEvent" 
                  action="{!c.checkChildMessage}"/>
    
    <!-- Calling child component -->
    <c:childComponent />
    
     <p>{!v.messageFromEvent}</p>
</aura:component>

parentComponentController.js
//parentComponentController.js
({
 checkChildMessage : function(component, event, helper) {
        //Fetch event message set in child component.
        var eventMsgFrmChild  = event.getParam("message");
        
        //Set event message to display in UI.
        component.set("v.messageFromEvent", eventMsgFrmChild);
 }
})


4. Result screen while executing [parentComponent]


5. Result screen while click on button.


Application Event Syntax :

Event  (ApplicationEvntExample.evt):
event type should be set as APPLICATION.
<aura:event type="APPLICATION" description="application event">
    <aura:attribute name="" type=""/>

</aura:event>


Firing component :
1. Event registration under .cmp file
        <aura:registerEvent name="applicationEvntExample" type="c:ApplicationEvntExample"/>

2. Firing event from controller/helper method
     
        var eventInst = $A.get("e.c:ApplicationEvntExample");
        eventInst.setParams({
               //set your parameters here as mentioned below
               //"param name"   : param value,
              //"param name"   : param value,             
        });
        eventInst.fire();
 
Receiving component :
1. Under .cmp file
     <aura:handler name="applicationEvntExm"
                  event="c:ApplicationEvntExample"
                  action="{!c.sampleMethod}"/>

2. Under Controller
    sampleMethod : function(component, event, helper) {
           event.getParam("param name");
}

Tuesday, December 19, 2017

Client side log message for lightning component.

Why to use?

1. Suppose we want to check any log message in our client side controller or helper method.
2. Suppose we want to check a client side controller or helper method is calling from a button click or not.
3. Suppose we want to check user request parameter(s) is coming properly or not to a client side controller or helper method.
4. Suppose we want to check server-side response.


How to develop?

In your controller or helper method use the below line of code,

console.log("Your condole log message.");


How to check?

Suppose we have a "Save" button in our lightning component and click on "Save" button will call a controller "doSave()" method.
Now we want to check is this method is calling or not? So, create a console.log("I am under doSave method.") under this doSave() method. Now open this component in browser and also open console window [For eg. to open console window in google chrome use "Ctrl + Shift + i "].
Now click on "Save" button and check console window and if every thing is OK, then we will see log message as "I am under doSave method." in console window.

Shortcut key for Lightning Component Button.

Scenario: Use the previously posted lightning component (UpdateStudent) [Post Subject : Crate a lightning component to update record.].
Now suppose we want to create/develop shortcut keys for "Save" [Alt + s] and "Cancel" [Alt + c] button for out component.


Solution: To develop the shortcut key in lightning component use "accesskey" key-word under your "lightning:button" component. So, for the above scenario use the below syntax under your "lightning:button" component,

  • For Save : accesskey="s"
  • For Cancel : accesskey="c"
And the button code base is look like this for our UpdateStudent component,

                <lightning:button aura:id="cancelId"
                                  label="Cancel"
                                  variant="brand"
                                  onclick="{!c.doCancel}"
                                  accesskey="c"/>
               
                <lightning:button aura:id="saveId"
                                  label="Save"
                                  variant="neutral"
                                  onclick="{!c.doSave}"
                                  accesskey="s"/>

So, update the component's buttons part with above code base and use "Alt + s" and "Alt + c" for save and cancel operation respectively.

How to add "lightning spinner" in a lightning component.

Please check my previous post "Crate a lightning component to update record." This post is an example of open a modal to update student detail.
Now, here we want to display a "spinner", when we click on "Save" button. This spinner will be displayed until the back end server side operation will be in process.

To perform the above scenario, fist execute the previous post (Crate a lightning component to update record.) and then add the below line of code in component(UpdateStudent.cmp) and controller(UpdateStudent.Controller.js).

Delta modification on component:

1. Add the below attribute :

<aura:attribute name="Spinner" type="Boolean" default="false" access="global"/>

2. Add below 2 aura:handlers :

<aura:handler event="aura:waiting" action="{!c.showSpinner}"/>
<aura:handler event="aura:doneWaiting" action="{!c.hideSpinner}"/>

3. Now add the below condition under modal body :
<aura:if isTrue="{!v.Spinner}">
      <lightning:spinner variant="brand" size="large"/>
 </aura:if>

Delta modification on controller:

Now add the below 2 methods under controller (UpdateStudent.Controller.js),

/**
     * @name:    showSpinner      
     * @date:        19 DEC 2017
     * @description: To show the Spinner when anything is in progress status from Server side.
    **/
    showSpinner: function(component, event, helper) {
       component.set("v.Spinner", true);
    },
    
    /**
     * @name:    hideSpinner      
     * @date:        19 DEC 2017
     * @description: To hide the Spinner when all Server side action has been coplelted.
    **/
    hideSpinner : function(component,event,helper){
     component.set("v.Spinner", false);
    },


After successful completion of above update, we can test out spinner functionality. For the same if we click on save button or on the time of initial record value load (edit button click) we will see a spinner as a processing activity.


Sunday, December 17, 2017

Crate a lightning component to update record.

Scenario: Suppose we have a Student object with 2 custom field Roll No and Class and assume that we have a student record, which we want to update. Now our aim is to create a lightning component to update Student record and to access this component we will override standard edit button of student object.

Solution: To solve the above scenario please follow the below steps,

1. Create a Student Object with below fields,
  • Standard field "Student Name" will automatically created.
  • Create 2 custom fields,
  1. Roll No        Roll_No__c     Number(18, 0)
  2. Class            Class__c          Text(10)


2. Create a lightning component named as "UpdateStudent" (To create lightning component please check my previous post, where I mentioned details with screen shots).

In the component header implements="lightning:actionOverride" . This is because we want to override standard edit button of this component (UpdateStudent).
And also implements="force:hasRecordId". This is because we need to display existing record on the time of component load by it's record id.

Now the component is look like this,


3. Now create a server side controller class and named it as "UpdateStudentCtrl", where we create logic for update student record.
Now this controller should have 2 methods and each should be annotated with <@AuraEnabled>,

  • updateStudent(Student__c student) ==> to update student record.
  • fetchStudentDetails(Id studentId)    ==> to fetch student details. This is required because, we need to show the details of student (name, roll no, class) on the time of component load.

/**
  * @name:        UpdateStudentCtrl      
  * @date:        15 Dec 2017
  * @description: This is the server side controller class for <UpdateStudent> lightning component.
  *             Server side update, fetch record will be perform here.
***/
public with sharing class UpdateStudentCtrl{
    /**
  * @name:        saveStudent      
  * @date:        17 Dec 2017
  * @description: This method is responsible to update student record. As this method is calling from
  *            client side lighthing component, so this should be annoted with <@AuraEnabled>.
  ***/
    @AuraEnabled
    public static void updateStudent(Student__c student){
        UPDATE student;
    }
    
    /**
  * @name:        fetchStudentDetails      
  * @date:        17 Dec 2017
  * @description: This method is responsible to fetch student record based on student id. As this method is calling from
  *            client side lighthing component, so this should be annoted with <@AuraEnabled>.
  ***/
    @AuraEnabled
    public static Student__c fetchStudentDetails(Id studentId) {
        List<Student__c> lstOfStd = new List<Student__c>();
        if(studentId != null)    
         lstOfStd = [SELECT Id, Name, Roll_No__c, Class__c FROM Student__c WHERE Id = :studentId];
        if(! lstOfStd.isEmpty())
         return lstOfStd.get(0);
        
        return null;
    }
}

3. Now in our component we have to create 3 input fields (Student Name, Roll No and Class) and two buttons (Save, Cancel). On the initial load of component the fields should have their existing values.
Click on Cancel button will hide or close the "Edit Student" window and click on Save will update the student record.

Now just copy paste the below component and it's client side controller. Details descriptions have been describe in code base.


=======================================================
=======================================================
<!-- UpdateStudent.cmp -->
<aura:component implements="lightning:actionOverride,force:hasRecordId"
                             controller="UpdateStudentCtrl">
    
    <!-- Attribute declaration -->
    <aura:attribute name="studentObj" type="Student__c" default="{ 'sobjectType': 'Student__c'}"/>
    
    <!-- hadlerMethod declaration -->
    <aura:handler name="init" value="{!this}" action="{!c.doInit}"/>
    <!--/ hadlerMethod declaration -->
    
    <!-- modal -->
    <div aura:id="modalIdForEditStudent" role="dialog" tabindex="-1" aria-labelledby="header41" class="slds-modal slds-fade-in-open">
        <div class="slds-modal__container">
            <!-- header -->
            <div class="slds-modal__header">
                <h2 id="header43" class="slds-text-heading--medium">
                    Edit Student
                </h2>
            </div>
            <!--/ header -->
            <!-- modal body -->
            <div class="slds-form slds-grid slds-wrap slds-modal__content">                
                <div class="slds-col--padded slds-size--1-of-1">
                    <div class="slds-form-element">
                        <lightning:input aura:id="stdName"
                                         label="Student Name"
                                         type="String"
                                         required="true"
                                         value="{!v.studentObj.Name}"/>
                    </div>
                </div>
                <div class="slds-col--padded slds-size--1-of-1">
                    <div class="slds-form-element">
                        <lightning:input aura:id="stdClass"
                                         label="Class"
                                         type="String"
                                         value="{!v.studentObj.Class__c}"/>
                    </div>
                </div>
                <div class="slds-col--padded slds-size--1-of-1">
                    <div class="slds-form-element">
                        <lightning:input aura:id="stdRoll"
                                         label="Roll No"
                                         type="Number"
                                         value="{!v.studentObj.Roll_No__c}"/>
                    </div>
                </div>
            </div>
            <!--/ modal body -->
            
            <!-- modal footer -->
            <div class="slds-modal__footer">
                <!-- Button -->
                <lightning:button aura:id="cancelId"
                                  label="Cancel"
                                  variant="brand"
                                  onclick="{!c.doCancel}"/>
                <lightning:button aura:id="saveId"
                                  label="Save"
                                  variant="neutral"
                                  onclick="{!c.doSave}"/>    
            </div>
        </div>        
    </div>
    <!--/ modal footer -->
    
    <div aura:id="backdropIdForEditStudent" class="slds-backdrop slds-backdrop--open"/>   
</aura:component>
===========================================================
===========================================================
//UpdateStudentController.js
({
    /**
     * @name:    doInit      
     * @date:        17 DEC 2017
     * @description: This method is handler method of UpdateStudent component and hence it will be
     *      call on the time of component initial load.
     *      This method is responsible to fetch the existing record.
     **/
    doInit : function(component, event, helper) {
        //Calling server side controller's fetchStudentDetails() method.
        var action = component.get("c.fetchStudentDetails");
        //Set method parameter of updateStudent() method, where "v.recordId" returns object record id of current screen.
        action.setParams({"studentId": component.get("v.recordId")});
        
        action.setCallback(this, function(response){
            //<response.getState()> return response status as SUCCESS/ERROR/INCOMPLETE etc.
            var state = response.getState();
            console.log("state="+state)
            //If response from server side is <SUCCESS>, then we will set the component attribute "studentObj".
            if (state === "SUCCESS"){
                var responseStudentRecord = response.getReturnValue();
                component.set("v.studentObj", responseStudentRecord);
            }else if (state === "INCOMPLETE") {
                //Offline message display logic.
                var toastEvent = $A.get("e.force:showToast");
                toastEvent.setParams({
                    "title": "OFFLINE!",
                    "message": "You are in offline."
                });
                toastEvent.fire();
            }else if (state === "ERROR") {
                //Error message display logic.
                var errors = response.getError();
                var toastEvent = $A.get("e.force:showToast");
                toastEvent.setParams({
                    "title": "ERROR!",
                    "message": errors[0].message
                });
                toastEvent.fire();
            }else {
                //Unknown message display logic.
                var toastEvent = $A.get("e.force:showToast");
                toastEvent.setParams({
                    "title": "UNKOWN!",
                    "message": "Unknown error."
                });
                toastEvent.fire();
            }
        });
        
        $A.enqueueAction(action);
    },
    
    /**
     * @name:    doCancel      
     * @date:        17 DEC 2017
     * @description: This method is responsible to cancel or close the modal window.
     **/
    doCancel : function(component, event, helper) {
        var cmpTargetForEdit = component.find('modalIdForEditStudent');
        var cmpBackDropForEdit = component.find('backdropIdForEditStudent');
        $A.util.removeClass(cmpBackDropForEdit,'slds-backdrop--open');
        $A.util.removeClass(cmpTargetForEdit, 'slds-fade-in-open');
    },
    
    /**
     * @name:    doSave      
     * @date:        17 DEC 2017
     * @description: This method is responsible to save student record.
     **/
    doSave : function(component, event, helper) {
  /** Server side controller calling logic. **/
        
        //Calling server side controller's updateStudent() method.
        var action = component.get("c.updateStudent");
        //Set method parameter of updateStudent() method.
        action.setParams({"student": component.get("v.studentObj")});
        
        action.setCallback(this, function(response){
            //<response.getState()> return response status as SUCCESS/ERROR/INCOMPLETE etc.
            var state = response.getState();
            console.log("state="+state)
            //If response from server side is <SUCCESS>, then we will display a success message.
            if (state === "SUCCESS"){
                //Success message display logic.
                var toastEvent = $A.get("e.force:showToast");
                toastEvent.setParams({
                    "title": "Success!",
                    "message": "Student record has been updated successfully."
                });
                toastEvent.fire();
                
                //Navigate to detail page.
                window.location ="/"+component.get("v.recordId");
            }else if (state === "INCOMPLETE") {
                //Offline message display logic.
                var toastEvent = $A.get("e.force:showToast");
                toastEvent.setParams({
                    "title": "OFFLINE!",
                    "message": "You are in offline."
                });
                toastEvent.fire();
            }else if (state === "ERROR") {
                //Error message display logic.
                var errors = response.getError();
                var toastEvent = $A.get("e.force:showToast");
                toastEvent.setParams({
                    "title": "ERROR!",
                    "message": errors[0].message
                });
                toastEvent.fire();
            }else {
                //Unknown message display logic.
                var toastEvent = $A.get("e.force:showToast");
                toastEvent.setParams({
                    "title": "UNKOWN!",
                    "message": "Unknown error."
                });
                toastEvent.fire();
            }
        });
        
        $A.enqueueAction(action);
 }
})

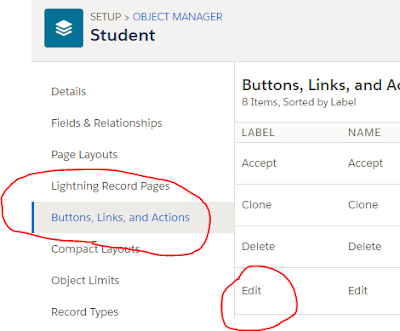
4. Now we have to override standard edit button of Student record with the above created lightning component. For the same go to "Buttons, Links, and Actions" link of Student object and then edit the edit button and override our lightning component (UpdateStudent).


Edit button override step:


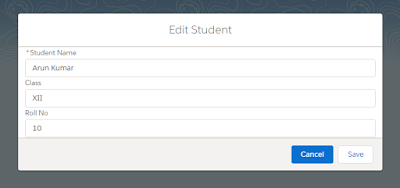
5. Once the above step done, then open any student record and click on edit button will open our component as a modal window with existing record value.
For testing, change the input field and click on save button will save the record with success message and finally redirect to student detail page with updated value.

=> Existing student record.


=> Click on Edit button will open modal window with existing value.


=> Modal window with updated value.


=> Click on save button will save the record with success message


=> Finally it will redirect to student detail page with updated value.

Crate a lightning component to insert record.

Scenario: Suppose we have a Student object with 2 custom field Roll No and Class. Now our aim is to create a lightning component to insert Student record and to access this component we will create a custom "Lightning Component Tab".

Solution: To solve the above scenario please follow the below steps,

1. Create a Student Object with below fields,

  • Standard field "Student Name" will automatically created.
  • Create 2 custom fields,
  1. Roll No        Roll_No__c Number(18, 0)
  2. Class        Class__c         Text(10)
2. Create a lightning component named as "NewStudent" (To create lightning component please check my previous post, where I mentioned detail screen shots).
In the component header implements="force:appHostable" . This is because we want to create a "Lightning Component Tab" for this component (NewStudent). Now the component is look like this,


3. Now in our component we have to create 3 input fields (Student Name, Roll No and Class) and one button (Save).
[Note 1: We can make different slds styling as per our requirement. For this example I am using "lightning:card"].

[NOTE 2 : Before copy paste below component's code base just create an apex class named as "NewStudentCtrl", because this component has a reference of this apex class. Code base is described later.]


<!-- ######## NewStudent.cmp ###### -->

<aura:component implements="force:appHostable"
                 controller="NewStudentCtrl">
    <!-- Attribute declaration -->
    <aura:attribute name="studentObj" type="Student__c" default="{ 'sobjectType': 'Student__c'}"/>
    
    <div class="slds-grid">
        <lightning:card title="New Student" footer="Click on Save button to create new Student.">
            <!-- Save button -->
            <aura:set attribute="actions">
                <lightning:button aura:id="saveId"
                                  label="Save"   
                                  onclick="{!c.doSave}"/>
            </aura:set>
            <!--/ Save button -->
            
            <!-- Body -->
            <p class="slds-p-horizontal_small">
                <lightning:input aura:id="stdName"
                                 label="Student Name"
                                 type="String"
                                 required="true"
                                 value="{!v.studentObj.Name}"/>
                <lightning:input aura:id="stdClass"
                                 label="Class"
                                 type="String"
                                 value="{!v.studentObj.Class__c}"/>
                <lightning:input aura:id="stdRoll"
                                 label="Roll No"
                                 type="Number"
                                 value="{!v.studentObj.Roll_No__c}"/>
            </p>
            <!--/ Body -->
        </lightning:card>
    </div>
    
</aura:component>

4.  Now click on controller and copy-paste the below code same for our example.


({
 doSave : function(component, event, helper) {
  /** Server side controller calling logic. **/
        
        //Calling server side controller's saveStudent() method.
        var action = component.get("c.saveStudent");
        //Set method parameter of saveStudent() method.
        action.setParams({"student": component.get("v.studentObj")});
        
        action.setCallback(this, function(response){
            //<response.getState()> return response status as SUCCESS/ERROR/INCOMPLETE etc.
            var state = response.getState();
            //If response from server side is <SUCCESS>, then we will display a success message.
            if (state === "SUCCESS"){
                //Success message display logic.
                var toastEvent = $A.get("e.force:showToast");
                toastEvent.setParams({
                    "title": "Success!",
                    "message": "Student record has been inserted successfully."
                });
                toastEvent.fire();
            }else if (state === "INCOMPLETE") {
                //Offline message display logic.
                var toastEvent = $A.get("e.force:showToast");
                toastEvent.setParams({
                    "title": "OFFLINE!",
                    "message": "You are in offline."
                });
                toastEvent.fire();
            }else if (state === "ERROR") {
                //Error message display logic.
                var errors = response.getError();
                var toastEvent = $A.get("e.force:showToast");
                toastEvent.setParams({
                    "title": "ERROR!",
                    "message": errors[0].message
                });
                toastEvent.fire();
            }else {
                //Unknown message display logic.
                var toastEvent = $A.get("e.force:showToast");
                toastEvent.setParams({
                    "title": "UNKOWN!",
                    "message": "Unknown error."
                });
                toastEvent.fire();
            }
        });
        
        $A.enqueueAction(action);
 }
})


5. Now copy-paste server side controller class, which will responsible for inserting student record.


/**
  * @name:        NewStudentCtrl      
  * @date:        14 Dec 2017
  * @description: This is the server side controller class for <NewStudent> lightning component.
  *          Server side insertion will be perform here.
***/
public with sharing class NewStudentCtrl{
    /**
 * @name:        saveStudent      
 * @date:        14 Dec 2017
 * @description: This method is responsible to create student record. As this method is calling from
 *         client side lighthing component, so this should be annoted with <@AuraEnabled>.
 ***/
    @AuraEnabled
    public static void saveStudent(Student__c student){
        INSERT student;
    }
}


6. Once the above activities have been done, we have to create a custom "Lightning Component Tab" to execute the component (NewStudent).


7. Now time to test the component. Click on "New Student" tab and it will open the below screen.


8. Enter values as per screen and click on save button and it will insert a student record and if operation done successfully,then it will shown a success message as popup.


Wednesday, December 13, 2017

Create a lightning component to display list of 10 accounts name.

Description:
Create a lightning component which will responsible for displaying 10 account names.

Note: As our main aim is to understand how to create a lightning component and how it is interacting with salesforce server side (Apex class, data model), so this post is only focusing on the detail flow, but not on the lightning styling or other fine tuning ting like design pattern etc.

Please follow the below steps one by one,


  • Open developer console and create a new lightning component [New>Lightning Component]
  • It will open <New Lightning Bundle> modal, where give your component name (ViewListOfAccount) and description (optional, but use it for best practice).

  • After successful creation of lightning component, it will crate an aura-bundle (component, controller, helper etc.) For simplicity we will only use component and controller from this bundle. Now click on component and copy-paste the below code same for our example.
[NOTE : Before copy paste below component's code base just create an apex class named as "ViewListOfAccountCtrl", because this component has a reference of this apex class. Code base is described later.]
===========================================
<aura:component implements="force:lightningQuickAction"
                controller="ViewListOfAccountCtrl">
<!-- attribute declaration -->
    <aura:attribute name="listOfAccounts" type="List"/>
    
    <!-- hadlerMethod declaration -->
    <aura:handler name="init" value="{!this}" action="{!c.doInit}"/>
    
    <aura:iteration var="acc" items="{!v.listOfAccounts}">
        <ui:outputText value="{!acc.Name}"/><br/>
    </aura:iteration>
</aura:component>
===========================================
  • Now click on controller and copy-paste the below code same for our example.

({
 /**
  * @name:        doInit      
  * @date:        13 Dec 2017
  * @description: This method is call automatically when this component hit first time.
  *      For for simplicity purposes, we are calling this component from a button/action click under account detail page.
  *      This method simply call a server side controller method and fetch 10 account records.
  **/
    doInit: function(component, event, helper) {
        /** Server side controller calling logic. **/
        
        /*<getListOfAccounts> is server side controller method, 
         * which return list of 10 account records.*/
        var action = component.get("c.getListOfAccounts");
        
        action.setCallback(this, function(response){
            /*<response.getState()> return response status as SUCCESS/ERROR/INCOMPLETE etc.*/
            var state = response.getState();
            /*If response from server side is <SUCCESS>, then we will set response (list of accouts)
             *under lightning attribute <listOfAccounts> (defined under ViewListOfAccount.cmp)*/
            if (state === "SUCCESS"){
                var lstOfAcc = response.getReturnValue();
                console.log("State === > "+lstOfAcc);
             if(lstOfAcc != null)
                 component.set("v.listOfAccounts", lstOfAcc);
            }
        });
        
        $A.enqueueAction(action);
    }
})

  • Now, our aim is to displaying 10 account name. So, we have to create a server side apex class, where we can create a method, which will return list of 10 account records. This class is generally called as server side controller for your lightning component. For this example I am creating a controller apex class named as ViewListOfAccountCtrl , under this class I have to create a method which will return list of 10 Account records. Suppose the method name is getListOfAccounts(). Now as this method will be called from client side lightning component, so it should be annotated with @AuraEnabled keyword. Please check the below code sample.         

/**
  * @name:        ViewListOfAccountCtrl      
  * @date:        13 Dec 2017
  * @description: This is the server side controller class for <ViewListOfAccount> lightning component.
  *      All the server side action items (like insert, update, select etc.) will be perform here.
***/
public class ViewListOfAccountCtrl {
    /**
   * @name:        getListOfAccounts      
      * @date:        13 Dec 2017
      * @description: This method is responsible to return max 10 number of account records. As this method is calling from
      *      client side lighthing component, so this should be annoted with <@AuraEnabled>.
 ***/
    @AuraEnabled
    public static List<Account> getListOfAccounts(){
        return [SELECT Id, Name FROM Account LIMIT 10];
    }
}


  • We have done our development and now our aim is to execute this component to check our result. For simplicity I want to call this component using a action button under Account detail page and for the same we have to crate an quick action for Account object and set this action in account page layout. Once done we can execute our component by click on action button. For the same please do the following steps,
  • Go to Account object and click on link named as "Buttons, Links and Actions". Now create an new action by click on "New Action" button.

  • Click on this button will open "New Action" window where we have to add the required detail to create the new action. Select "Action Type" as "Lightning Component", "Lightning Component" as "c:ViewListOfAccount", "Height" as "250px", "Label" as "View List of Account" and give the "Description".

  • Now add this action under account page layout and open any account record. Here you will see the "View List of Account" action button on the top - left corner of account detail page. Click on this button will open "View List of Account" modal with maximum 10 account name. (Note: before execute the component, please create some account for testing).

LWC to LWC Communication using Lightning Messaging Service (Part - 2)

In my previous post ( previous post link ) we have learn how to create a Lightning Messaging Service with 6 steps and today we will use the ...