Sunday, June 18, 2023

LWC to LWC Communication using Lightning Messaging Service (Part - 2)

In my previous post (previous post link) we have learn how to create a Lightning Messaging Service with 6 steps and today we will use the same Lightning Messaging Service to communicate between 2 LWC components.


Solution:

Step-1: 

Create 2 LWC components "myLWCOne" and "myLWCTwo" from your VS Code Editor.

Step-2: 

Update the package.xml under manifest folder with below code, here I have added two newly created LWC components under "LightningComponentBundle".

<?xml version="1.0" encoding="UTF-8" standalone="yes"?>
<Package xmlns="http://soap.sforce.com/2006/04/metadata">
    <types>
        <members>myLWCOne</members>
        <members>myLWCTwo</members>
        <name>LightningComponentBundle</name>
    </types>
    <types>
       <members>*</members>
       <name>LightningMessageChannel</name>
    </types>
    <version>57.0</version>
</Package>


Step-3: 

Below are the "myLWCOne" lightning component codebase,

myLWCOne.html
<template>
    <lightning-card  title="LWC One Component">
        <div class="slds-var-p-around_medium lgc-bg">
            <lightning-input type="text"
            label="Enter some messge to Publish" onkeyup={handleKeyUp}>
            </lightning-input>
        </div>

        <div class="slds-p-around_medium lgc-bg">
            <lightning-button label="Publish" onclick={handlePublishMessage}>
            </lightning-button>
        </div>
    </lightning-card>
</template>

myLWCOne.js
import { LightningElement, wire } from 'lwc';
import demoMsgChannel from "@salesforce/messageChannel/MyLightningMS__c";
import { MessageContext, publish} from 'lightning/messageService';
export default class MyLWCOne extends LightningElement {
    inputVal;
    @wire(MessageContext)
    context;

    handleKeyUp(event){
        this.inputVal = event.target.value;
    }

    handlePublishMessage(){
        const message = {
            //messageToSend is nothing but the fieldName we have created
            //under MYLightningMS Channel
            messageToSend:{
                value:this.inputVal
            }
        }
        // publish(messageContext, messsageChannel, message); <<<< PUBLISH TEMPLATE
        publish(this.context, demoMsgChannel, message);
    }
}

myLWCOne.js-meta.xml
<?xml version="1.0" encoding="UTF-8"?>
<LightningComponentBundle xmlns="http://soap.sforce.com/2006/04/metadata">
    <apiVersion>57.0</apiVersion>
    <isExposed>true</isExposed>

    <targets>
        <target>lightning__AppPage</target>
    </targets>
</LightningComponentBundle>


Step-4: 

Below are the "myLWCTwo" lightning component codebase,

myLWCTwo.html
<template>
    <lightning-card  title="LWC Two Component">
        <div class="slds-var-p-around_medium lgc-bg">
            Message Received From Component One is <strong>{receivedMessage}</strong>
        </div>
    </lightning-card>
</template>

myLWCTwo.js
import { LightningElement, wire } from 'lwc';
import demoMsgChannel from "@salesforce/messageChannel/MyLightningMS__c";
import { APPLICATION_SCOPE, MessageContext, subscribe} from 'lightning/messageService';
export default class MyLWCTwo extends LightningElement {
    receivedMessage;
    @wire(MessageContext)
    context;

    //To call the subscribeMessage() method on pageloge we will
    //use connectedCallback() method.
    connectedCallback(){
        this.subscribeMessage();
    }

    subscribeMessage(){
        //subscribe(messageContext, messageChannel, listner, subscriberOption)
        subscribe(this.context, demoMsgChannel,
                    (message)=>{this.handleMessage(message)},
                        {scope:APPLICATION_SCOPE});
    }

    handleMessage(message){
        this.receivedMessage = message.messageToSend.value
                    ? message.messageToSend.value : "No Message Send or Published.";
    }
}

myLWCTwo.js-meta.xml
<?xml version="1.0" encoding="UTF-8"?>
<LightningComponentBundle xmlns="http://soap.sforce.com/2006/04/metadata">
    <apiVersion>57.0</apiVersion>
    <isExposed>true</isExposed>

    <targets>
        <target>lightning__AppPage</target>
    </targets>
</LightningComponentBundle>

Step-5: 

Create an App Page and drag these 2 LWC components under it.

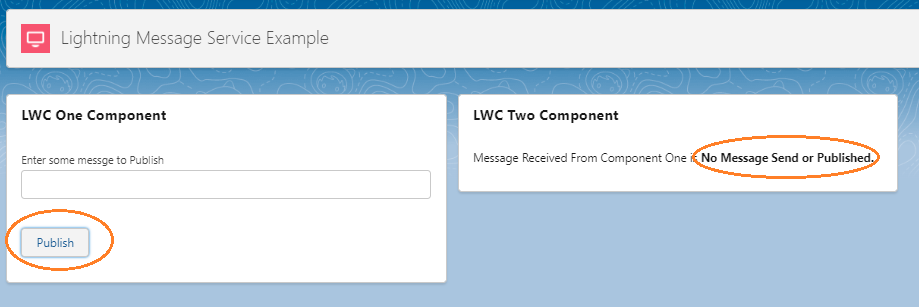
And after save and activate this page, search for "Lightning Messaging Service Example" whcih is my App Page as created above screen and then click on it and it will be look like below screen,

Step-6: 

Now it's time to test.

Test-1: Click on "Publish" button without entering any input text under "LWC One Component" and after click on "Publish" button, as no input pass from Component One so it will display below message in "LWC Two Component".

Test-2: Click on "Publish" button after enter some input text under "LWC One Component" and after click on "Publish" button, inputted value will be pass from Component One to Component Two and it will display below message in "LWC Two Component".


Note: Full development details will be share in my YouTube Channel very quickly, so please do subscribe my YouTube Channel YouTube (AKH Coding Class) to get more information like this.


LWC to LWC Communication using Lightning Messaging Service (Part - 1)

Scenario: Our aim is to send some message from 2 different LWC Components where there is no Parent Child relationship between them and we will pass this message using Lightning Messaging Service.

After completing this assignment we will execute the below Screen, where in 1st LWC component (LWC One Component) has an Input field and a Submit button named as "Publish".

If user input some value and click on "Publish" button then 2nd LWC component (LWC Two Component) will display the message passed in component one's input filed.


Solution:

Note: In this post I will only focus on how to develop a Lightning Messaging Service. So, assumming, you have a good understanding of how to create Project in VS Code, how to create a LWC component inn VS Code, how to deploy comonent from VS Code to Salesforce ORG etc.

First we will follow below 6 Steps to implement Lightning Messaging Service and then we will apply this LMS with 2 LWC Components:

Step-1: 

Create a Project with Manifest in VS Code. 

For my case the Project name is LIGHTNINGMESSAGINGSERVICE and System will automatically create the below files and folders structures.

Step-2: 

Create a folder named as "messageChannels" under "force-app\main\default". 

Note: folder name should be "messageChannels".

Step-3:

Create a XML file under the above crated "messageChannels" folder and the naming convention of this file should be as mentioed below.
Any_User_Defined_Name.messageChannel-meta.xml

For my case the file name I have given as "MyLightningMS.messageChannel-meta.xml".

Step-4:

Now once your "MyLightningMS.messageChannel-meta.xml" file is ready then please put the below code under this file,
<?xml version="1.0" encoding="UTF-8" standalone="yes"?>
<LightningMessageChannel xmlns="http://soap.sforce.com/2006/04/metadata">
    <masterLabel>MyMessageChannel</masterLabel>
    <description>This is my first Lightning Message Channel</description>    
    <isExposed>true</isExposed>

    <lightningMessageFields>
       <fieldName>messageToSend</fieldName>
       <description>message To Send</description>
   </lightningMessageFields>
   <!-- We can create multiple fields based on our needs. Below is one example -->
    <lightningMessageFields>
        <fieldName>myLMSData</fieldName>
        <description>Variable used for Lightning Message Service</description>
    </lightningMessageFields>
</LightningMessageChannel>

Step-5:

Now we have to deploy this "MyLightningMS.messageChannel-meta.xml" file to your respective Salesforce Org. So, open the "package.xml" under "manifest" folder.

And now update the package.xml with below lines of code,
<?xml version="1.0" encoding="UTF-8" standalone="yes"?>
<Package xmlns="http://soap.sforce.com/2006/04/metadata">
    <types>
       <members>*</members>
       <name>LightningMessageChannel</name>
    </types>
    <version>57.0</version>
</Package>

NOTE: Keep in mind your package.xml version should be more than 47. For our case you can see in above screen it is 57.0

Step-6:

Now its time to deply this Message Channel. Authorize your Salesforce from this VS Code Editor and then Deploy this.

Now your Lightning Messaging Service is ready to use. In my next post (LWC to LWC Communication using Lightning Messaging Service (Part - 2), I will use this LMS to communicate between 2 LWCs.

Friday, February 17, 2023

Salesforce and Open AI's GPT-3 (Chat GPT) Integration Sample Apex Code.

 I have implemented a simple use case to communicated between Salesforce and Open AI's GPT-3 (Chat GPT).

Click on the below link to get the full video details,

Salesforce ChatGPT Use Case

Use Case Details:
Lets create a Salesforce Screen where User can see multiple dog breed images in a left panel, which will be dynamically fetch from salesforce record (say the object name is "Dog Breed") and the image will be set in static resource. Now click on any breed image, it's details will be display in right panel.
But, the main aim is that the details will not be collected from any Salesforce Database. It should come from Open AI's GPT-3 (Chat GPT).

Solution:
As solution you have to perform few steps as mentioned below,
1) Create a App Builder name as "Dog Breed" (with Header and Right Side Bar) for above page layout design.
2) Check the "Lightning Page Tab" for above created App Builder (Dog Breed).
3) Create a Lightning Console App (Dog Breed App) and add the above tab as navigation item.
4) Create a "Dog Breed" custom object with 2 fields ,
     i. Name (Capture the Breed Name)
    ii. Image Url (Capture the static resource image location)
5. Create 2 LWC Component
     i. One to show the list of Breed Image (collected from Dog Breed records)
    ii. Two to display the breed details response collected from Open AI's GPT-3
6. Set Remote Site Settings in Salesforce Org (https://api.openai.com).
7. Create an account on Open AI (Signup link: https://openai.com/api/).

8. Login to Open AI and go to the below link 
https://platform.openai.com/docs/quickstart/build-your-application
and scroll down to below section to create your Secret Key,


Note:
1. In this example, I am not going to show you how to create and design the above 2 LWC component, but I am going to share how to connect with Open AI's GPT-3 to take the response (dog breed details).

2. Also as I just did the R&D to communicate between Salesforce and Open AI - so, I am just trying to concentrate on the code how to connect with these two platform, but you can modify the code base by following best practice.

So, here is your Webservice call sample code,

public with sharing class ChatGPTConnectHelper {
    static String END_POINT = 'https://api.openai.com/v1/completions';
    // Pass the breedName parameter's value from UI level, once user clicks on any breed image.
    public static String getChatGPTResponse(String breedName){
        try{
            HttpRequest request = new HttpRequest();

            request.setEndpoint(END_POINT);
            request.setMethod('POST');
            //Use Secreate Key
            request.setHeader('Authorization', 'Bearer '+String.escapeSingleQuotes('Put Your Secret Key').trim());
            request.setTimeout(120000);
            request.setHeader('Content-Type', 'application/json;charset=UTF-8');
           
            String reqQuery = 'Give me ' + breedName + ' Dog Breed Details';
            String reqBody = '{"model": "text-davinci-003","prompt":"'
                +reqQuery+
                '","max_tokens": 4000,"temperature": 0.5,'
                +'"stream": false,"top_p": 1}';
            request.setBody(reqBody);

            Http http = new Http();
            HttpResponse response = http.send(request);          
            //return response.getBody();
            //TODO: Instead below code use proper JSON Formatting to collect the breed details.

            // For simplicity I am using the below formatting.
            String result = String.valueOf( JSON.deserializeUntyped(response.getBody()) );
            Integer firstInd = result.indexOf('text');
            Integer lstInd = result.indexOf('created');
            result = result.substring(firstInd+5, lstInd-4);
            return result;
        } catch(System.CalloutException e){
          System.debug('Sorry, You have an error ' + e.getMessage());
        }
        return null;
    }
}

Click on the blow link to check what is ChatGPT and how to create an account:

ChatGPT Quick Overview

How to create a ChatGPT Account

Sunday, January 1, 2023

Create a Program to Find Armstrong Number | Java While Loop | Class#34

Click on the below link to check the video 👇

Java Class-34
 

Check the YouTube Description for more high level theory details and assignment if design for this video.

If you love this then please don't forget to Like, Share and Subscribe my YouTube Channel.

LWC to LWC Communication using Lightning Messaging Service (Part - 2)

In my previous post ( previous post link ) we have learn how to create a Lightning Messaging Service with 6 steps and today we will use the ...