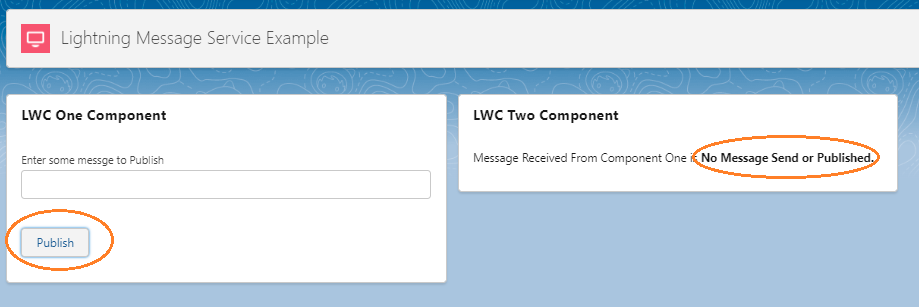
Scenario: Our aim is to send some message from 2 different LWC Components where there is no Parent Child relationship between them and we will pass this message using Lightning Messaging Service.
After completing this assignment we will execute the below Screen, where in 1st LWC component (LWC One Component) has an Input field and a Submit button named as "Publish".
If user input some value and click on "Publish" button then 2nd LWC component (LWC Two Component) will display the message passed in component one's input filed.
Solution:
Note: In this post I will only focus on how to develop a Lightning Messaging Service. So, assumming, you have a good understanding of how to create Project in VS Code, how to create a LWC component inn VS Code, how to deploy comonent from VS Code to Salesforce ORG etc.
First we will follow below 6 Steps to implement Lightning Messaging Service and then we will apply this LMS with 2 LWC Components:
Step-1:
Create a Project with Manifest in VS Code.
For my case the Project name is LIGHTNINGMESSAGINGSERVICE and System will automatically create the below files and folders structures.
Step-2:
Create a folder named as "messageChannels" under "force-app\main\default".
Note: folder name should be "messageChannels".
Step-3:
Create a XML file under the above crated "messageChannels" folder and the naming convention of this file should be as mentioed below.
Any_User_Defined_Name.messageChannel-meta.xml
For my case the file name I have given as "MyLightningMS.messageChannel-meta.xml".
Now once your "MyLightningMS.messageChannel-meta.xml" file is ready then please put the below code under this file,
<?xml version="1.0" encoding="UTF-8" standalone="yes"?>
<LightningMessageChannel xmlns="http://soap.sforce.com/2006/04/metadata">
<masterLabel>MyMessageChannel</masterLabel>
<description>This is my first Lightning Message Channel</description>
<isExposed>true</isExposed>
<lightningMessageFields>
<fieldName>messageToSend</fieldName>
<description>message To Send</description>
</lightningMessageFields>
<!-- We can create multiple fields based on our needs. Below is one example -->
<lightningMessageFields>
<fieldName>myLMSData</fieldName>
<description>Variable used for Lightning Message Service</description>
</lightningMessageFields>
</LightningMessageChannel>
Step-5:
Now we have to deploy this "MyLightningMS.messageChannel-meta.xml" file to your respective Salesforce Org. So, open the "package.xml" under "manifest" folder.
And now update the package.xml with below lines of code,
<?xml version="1.0" encoding="UTF-8" standalone="yes"?>
<Package xmlns="http://soap.sforce.com/2006/04/metadata">
<types>
<members>*</members>
<name>LightningMessageChannel</name>
</types>
<version>57.0</version>
</Package>
NOTE: Keep in mind your package.xml version should be more than 47. For our case you can see in above screen it is 57.0
Step-6:
Now its time to deply this Message Channel. Authorize your Salesforce from this VS Code Editor and then Deploy this.
Now your Lightning Messaging Service is ready to use. In my next post (LWC to LWC Communication using Lightning Messaging Service (Part - 2), I will use this LMS to communicate between 2 LWCs.


