In this post, I will show you how to Assign a Service Appointment
/ Assign a Technician using Dispatch Console.
Note: As the main aim
of this post is to show you Technician Assignment using Dispatch Console, so here,
we are not focus on FSL Org creation, Field
Service Lightning enablement for you Org or FSL managed package
installation. Assuming all the above setup, you have already completed
before jump to this post instruction.
All details related to FSL managed package installation are available in Salesforce documentation.
Scenario:
Let say there is a Medical Device manufacturer Company,
which sells Medical Device to its customers and offer field service if customers
face any issue on their purchase device(s).
Let say it is a big company and that is why it maintains territories
hierarchy across the region. Company has numbers of Technician across the
region and these technicians have working hour from 9 AM to 6 PM (Mon – Fri)
and 9 AM to 3 PM (Sat).
Now our aim is to assign the technician based on their
availability (depends on working hour, skill, territories etc.)
Solution:
As mentioned previously about the Org setup and FSL managed
packaged installation, so if you have done that properly then you are ready to
execute the above scenario.
Step 1: (Important Tabs)
Go to the App Launcher
and select Field Service Admin
app. Here you will get below Tabs, which are required to setup master data for our
requirement.
Tab Details (Just go through it. From next steps, I will show you details with evidence):
- Operating Hours: Using this tab user can create working hour for our technicians. User can include time slots for 7 days (Mon – Sun).
- Service Territories: Using this tab user can create Territories based on their business. Under each territory user can assign an Operating Hour. User can also assign multiple Service Resources () under each Territories.
- Service Resources: Using this tab user can create Service Resource. Each Service Resource is align with one User. User can define Service Resource’s type like technician, dispatcher, agent etc. Service Resource can have multiple Skills, multiple Territories.
- Work Types: Using this tab user can create Work Type, which is nothing but a template based on that Service Appointment will be auto created [If <Auto-Create Service Appointment> checkbox is marked as checked for that Work Type]. User can add multiple skills for each Work Type.
- Work Rules: Using this tab user can create Work Rules. This is nothing but rule or filter criteria based on that Service Resource will be assign for any Service Appointment. While installing FSL managed packaged, few rules (Active Resources, Match Skills, Match Territory, Excluded Resources etc.) are automatically created. Each rule belongs to a record type and hence different page layout.
- Service Objectives: Using this tab user can create Service Objective. This is nothing but rule or filter criteria based on that Service Resource will be assign for any Service Appointment. While installing FSL managed packaged, few Service Objectives (ASAP, Minimize Overtime, Minimize Travel, Skill Level etc.) are automatically created. Each rule belongs to a record type and hence different page layout.
- Scheduling Policies: Using this tab user can create scheduling policies based on which Resource will be schedule. This scheduling policy are implemented or created with one or multiple Work Rule(s) and Service Objective(s).
- Field Service Settings: This is most important tab under <Field Service Admin> app. Using this tab user can done all above operation in one place.
Step 2: (Operating Hours setup)
Click on Operating Hours Tab to create operating hour with below details,

Once created add time slots (Left click and drag on calendar
under “Time Slots Editor”) from 9 AM to 6
PM (Mon – Fri) and 9 AM to 3 PM (Sat). If you have created a slot for
Monday, then you can Right Click on Monday’s slot and click on “Copy to next day” menu and it will
create same slot for next day.

Step 3: (Service Territories setup)
Create Service Territories [Kolkata (Under Kolkata à Kolkata North and Kolkata
South) and Delhi] as shown below,
Note: We can create it
from both “Territories” tab or from “Field Service Setting” tab. For this example,
we are using second one.
So click on “Field
Service Setting” tab and click on “Go
to Guided Setup” button and then click on “Service Territories” button. Finally add territories with below
details,
Enter your service territory name in the below text box and
then click on “Add” button and
select your territory and in right panel update the territory with operating
hour and territory address.


Drag Kolkata North and Kolkata South under Kolkata to make
territory hierarchy.

Step 4: (Skills setup)
Create skills (eg. Software
Update). To create Skills, we have to go to classic view and then type “Skills”
and then select “Skills” under “Field Service” menu item. Then click on “New”
button to create skill.

ALTERNATIVELY, we
can create and add skills directly while creating Work Type in next Steps.
Step 5: (Work Type setup with skills update)
Create Work Type
by click on “Field Service Setting”
tab and click on “Go to Guided Setup”
button and then click on “Work Types”
button. Finally add work type (Technician
Appointment) with below details,
Due Date Offset: 10080
Estimated Duration:
60
Duration Type:
Minutes
Auto-Create Service
Appointment: On
Skill Requirements:
Enter skill named, as “Software Update” and click Enter and system will display
alert for new skill creation. Click OK and it will add “Software Update” skill
under “Technician Appointment” work type.

Step 6:
Create Service
Resource (Lamer Smith) with below screen details from Service Resources tab,

Once done add skill (Software
Update) from detail page “Resource
Views” section. Checked "Software Update" check box and then click on "Save" button.

Do the same thing for other Service Resource creation with
below listed details and add “Software
Update” skills for every Service Resource.

Step 7: (Assign Service Resource to Service Territories)
Go to
service territories’ related list for Kolkata
North and Kolkata South and Delhi. From “Service Territory Member” related list click “New” button and add resource as mentioned below,


Step 8: (Work Rule and Service Objective setup)
Work Rule and Service
Objective creation. As mentioned above, while installing FSL managed
package in your Org, few data setup for Work Rules and Service Objectives will generate
automatically. So, currently no need of creation or modification of all two
types of records except “Resource Availability”
work rule as mentioned in below screen. We will use the existing record in our
next steps for “Scheduling Policy”
setup.
Note: If “Relevance
Group” is not available in Work Rule page layout, then add it from page
layout setup. Drag the Visualforce page vf001GroupOnWorkRules into the new
section you created and set the height to 100px.

Step 9: (Scheduling Policy setup)
Create Scheduling
Policy by click on “Field Service
Setting” tab and click on “Go to
Guided Setup” button and then click on “Scheduling Policies” button. Finally add Scheduling Policy named as “MDC
Scheduling Policy”.
Mandatory Work Rules (“Due
Date” and Earliest “Start Permitted”)
will automatically added to the above created policy and then add “Active Resources” and “Resource Availability” from <Available Rules> to <Selected Rules>.

Step 10:
Set this new Scheduling Policy (MDC Scheduling Policy) to be the default policy for Dispatchers and Appointment Booking.


Step 11: (Work Order creation)
Master data setup is ready. Now, go to the App Launcher and select Field Service app. For simplify the
example, just create Work Order
directly with territory “Delhi” and
select work type as “Technician Appointment”.

After save it will automatically create a Service Appointment.

Step 12: (Dispatch Console view)
Now click on <Field
Service> tab and it will open the Dispatch Console. Here click on <Territory Filtering> icon and for simplicity just select
all territories.

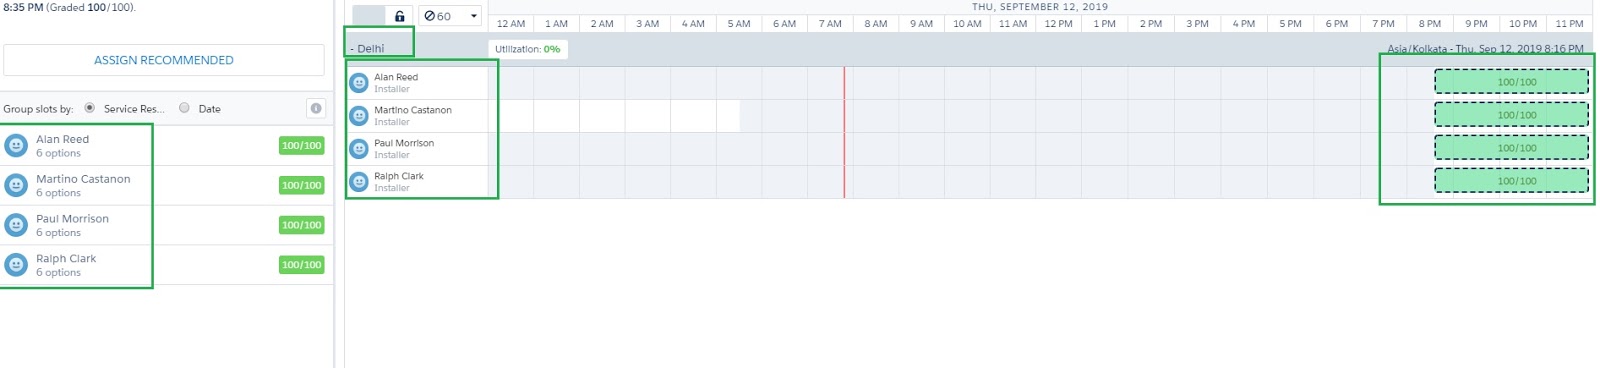
Step 13: (Check available Service Resources)
Now click on your newly created Service Appointment (For our
case it is SA-0018). It will show the details with some buttons (Candidate,
Schedule etc.). Click on Candidate
button and it will show all Service Resources available for appointment with
green colour.
Step 14: (Schedule Service Resource)
Now click on any resource (say Alan Reed) and it will show
all scheduling details for that resource. Click on available Schedule button for scheduling.

Once scheduled, it will mark as yellow colour.

Alternatively, you can again click on “Candidate” button to check
the assignment.

Step 14: (Dispatch Service Resource)
Finally you can dispatch it by right click on Yellow
schedule mark and click on [Change status > Dispatched] menu.

Once dispatched, it colour has been changed and status has
been changed as “Dispatched”.

